Measuring a Rimfire Chamber with Pin Gauges
I believe that when it comes to accuracy, the barrel is the most important component of a firearm, and the chamber is a critically important part of the barrel. It’s the chamber where accuracy is gained or is forfeited. Perhaps it is more important in a 22 Long Rifle chamber than in any other.
Why Do I Want to Know My Chamber Dimensions?
- When I rechambered two Ruger American Rimfire 22LR rifles from the standard factory “sporter” chamber configuration to the smaller “Bentz” chamber, I didn’t want to shorten the barrel any more than absolutely necessary, yet I needed to shorten it enough so that the smaller reamer would completely clean up the original chamber. See the video here.
- Certain manufacturers advertise their rifles as having “match” chambers. How do we know what that actually means? Is it really a ”match” chamber or just marketing hype?
- In addition to the SAAMI 22 Long Rifle chamber designations for “Sporting” and “Match” chambers, there are a dozen other wildcat “Match” chambers. How can we tell which one is best and which one is in our rifle?
- Being able to measure chambers and establish a database is one more step towards recognizing and tracking patterns or trends of optimizing 22 Rimfire accuracy.
- Ultimately, it really doesn’t matter if you are working in a machine shop or driving your car. If you want to get somewhere, you need to know where you’re starting from.
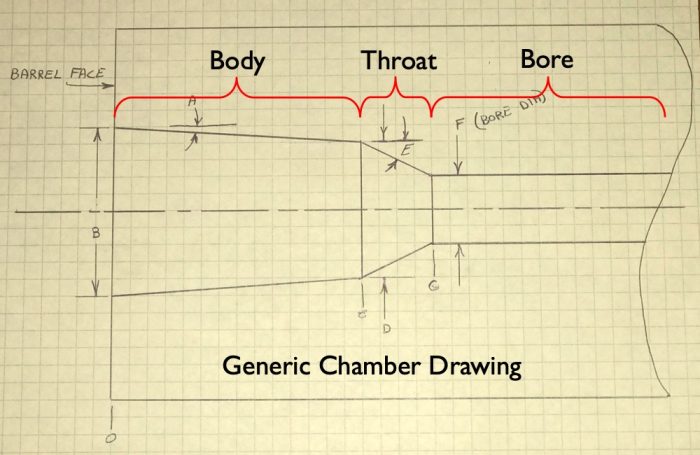
Measuring a 22LR Chamber with Pin Gauges
Notes:
- Your pin gauges need to have sharp, square corners, at least on the end you insert into the chamber. If the end is rounded or chamfered, your results will be confusing.
- Initially, I tried plotting all the data points with CAD (computer-aided design) software. However, I now prefer using Excel software because nearly everyone has it, and it will use every single data point (that I choose) to calculate the line equations.
- You might find a point or two that just doesn’t seem “fit” well on your graphs. This could be caused by a number of variables, including:
- Wear from years of firing and cleaning, or neglect
- Slight rounding of corners from a worn reamer or polishing after reaming
- Tool marks left in the chamber from the reaming process
- Chamber and barrel need cleaning
- Measuring error
- You would also see many of these same “noise” factors in a chamber casting on an optical comparator. In either case, you may need to use some judicious interpretation of the data, and it is OK to omit a point or two in your data analysis.
Using the Excel Template
- Open the Excel Template by clicking here.
- You will need to enter the measured diameter and pin OAL (overall length) data for your pin gauge set.
- Enter your measured protrusion data into the “Protrusion” column. The spreadsheet should calculate the radius and depth and fill the graphs on the right side. Use these graphs to determine which data belongs to the “Body” and which belongs to the “Throat.”
- When you click on a data point in the graph, it should highlight the graph data in the columns. You can then adjust which data is included by dragging the corners of the highlighted sections.
- If you’re measuring a barreled action using a cleaning rod guide, you can calculate the protrusion length using this equation:
Protrusion = Measured Length + Spacer Length – Guide Length
- Select that data for the graphs at the bottom by clicking on one of the data points in the graph and adjusting the highlighted section in the columns.
- Once Excel calculates the line equations for your graphs, you’ll need to enter those numbers into the yellow cells.
- That’s it! The numbers at the very bottom of the page should represent the chamber you just measured.